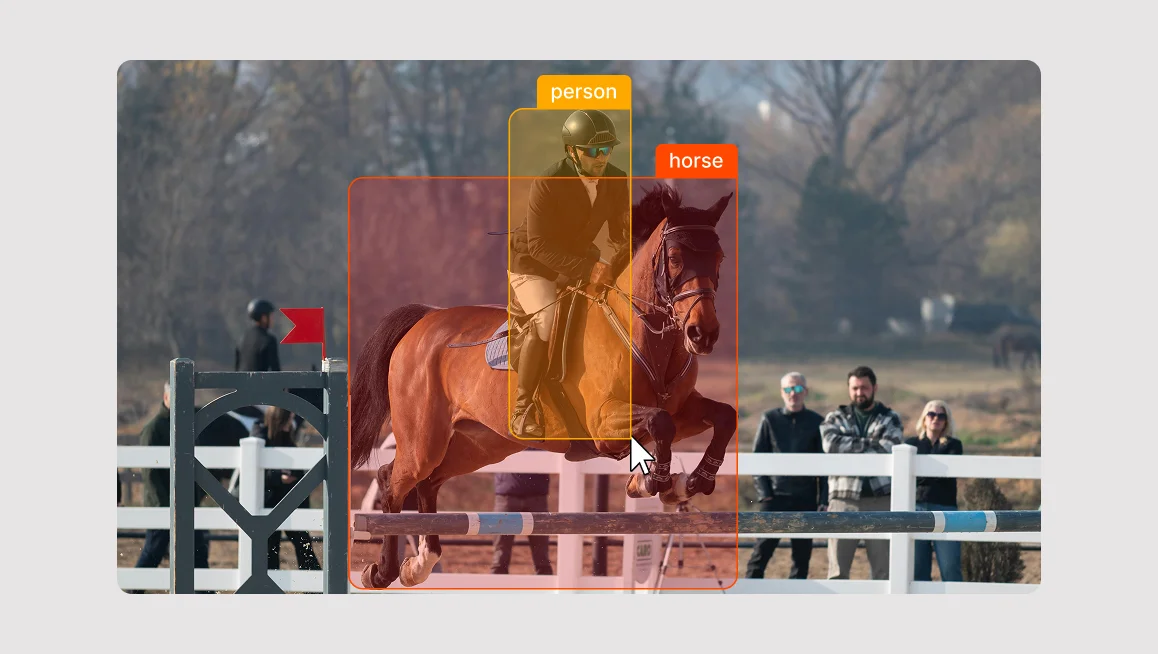
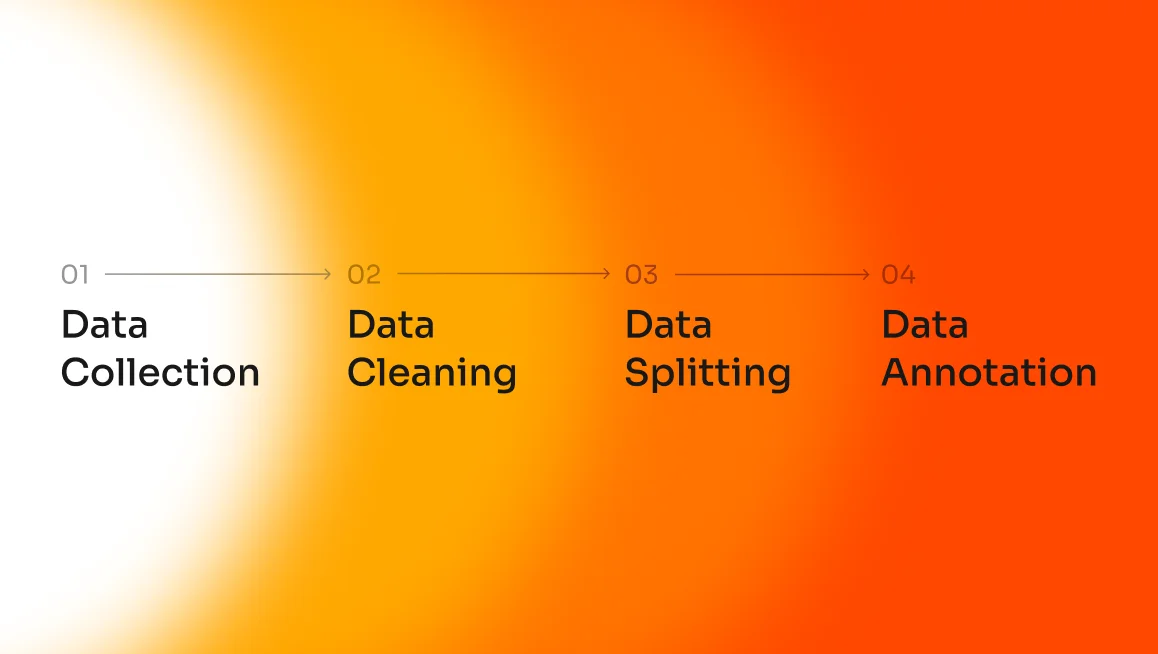
We often marvel at delivery robots, automated vacuum cleaners, self-driving cars navigating city streets, and medical AI spotting tumors that doctors missed. But behind every genius model isn't just code. It’s the power of image annotation and millions of meticulously labeled pixels. To create a model that is both accurate and scalable, you need to master the specialized techniques and workflows that define professional image annotation. In this introduction to image annotation article, we will examine what image annotation is, who is using it, how to use it, and how CVAT might be a good choice for your organization’s computer vision or machine learning projects. What is Image Annotation? Image annotation (or image data labeling) is the process of labeling images and adding tags to create datasets for training computer vision models. Doing so provides context for the machine learning model to understand and make predictions. With image data annotation software, the annotations generally come in the form of a shape such as a bounding box, polygon, or segmentation mask, along with a textual tag, or label. The geometric shape helps to visually and spatially define the object of interest in the image, while the textual tags help the AI model to identify and classify the object(s) in the image. Alt text: " Example of an image with bounding box annotations."editkeyboard_arrow_down In computer vision, identification, detection, object tracking, segmentation and classification are key processes that help machines interpret and understand visual data, and image annotation is required for achieving this goal. Image annotation can be a huge undertaking in terms of the amount of time and resources needed. With datasets ranging in size from a few thousand images, to several million images, it’s important to determine the best strategy for both acquiring datasets, and for annotating them. Such strategies can involve usage of public versus proprietary datasets, and the choice to use in-house annotation versus professional annotation services. We will examine these strategies in more depth later. In computer vision, identification, detection, object tracking, segmentation and classification are key processes that help machines interpret and understand visual data, and image annotation is required for achieving this goal. Image annotation can be a huge undertaking in terms of the amount of time and resources needed. With datasets ranging in size from a few thousand images, to several million images, it’s important to determine the best strategy for both acquiring datasets, and for annotating them. Such strategies can involve usage of public versus proprietary datasets, and the choice to use in-house annotation versus professional annotation services. We will examine these strategies in more depth later. What is Image Annotation Used For? Image annotation is the primary engine for training computer vision models. Through labeling images, you are essentially teaching a machine to see and interpret its surroundings, much like a child learns by pointing at objects and calling them out by name. In short, think of image annotation as providing ground truth labels for the computer vision model. Image annotation is also used for supervised learning, in which the model learns from annotated examples in the form of input-output pairs. In this case, the annotated data assists the model in understanding how an object should be identified. Finally, image annotation can also be used with performance evaluation to assess the accuracy of a model’s learning. The accuracy can be tested by comparing the model’s output to the annotated data (ground truth). As mentioned in the introduction, quality training data for these systems is largely dependent on quality image annotation. A proper image annotation process can help to improve model accuracy/data consistency, reduce time, costs, and biases, and lead to generally more efficient model training. What Are Some Applications & Use Cases for Image Annotation? Many different industries across the globe rely on image annotation to transform raw visual data into actionable machine intelligence. We can’t cover them all in this article, but the table below highlights popular industries and applications that depend on converting unstructured imagery, such as drone footage or medical scans, into labeled datasets. Industry/Application Annotation Type Key Use Cases & Goals Focus Areas Autonomous Vehicles Polyline Annotation Navigation, lane discipline, and obstacle avoidance. Road boundaries, solid/dashed lane lines, and temporary hazards (cones). Medical Imaging Polygon Annotation Tumor detection, growth tracking, and surgical planning. Irregular shape tracing, tissue differentiation, and anomaly flagging. Security / Facial Recognition Key-point Annotation Identity verification and authorized user access. Anatomical mapping (eyes, nose, lips), expression invariance, and obstruction management. Environmental Monitoring Semantic Segmentation Land use mapping, deforestation tracking, and disaster assessment. Pixel-level classification (forest, water, urban), habitat monitoring, and damage counting. Lane Marking for Autonomous Vehicles For a self-driving car to navigate safely, it must distinguish between the asphalt it can drive on and the obstacles it must avoid. Image annotation makes this possible by teaching the car to recognize road boundaries through polyline annotation. This involves human annotators tracing the exact lines of lane dividers, curbs, and road shoulders in thousands of images. By feeding this labeled data into the AI, the car develops a sense of spatial awareness, allowing it to maintain its position even in complex environments like construction zones or sharp highway curves. To give the vehicle a complete understanding of its surroundings, annotators focus on several key navigational elements: Road Boundary Identification: Tracing the edge where the pavement meets the grass or sidewalk to prevent the car from driving off-road. Lane Discipline Training: Highlighting solid and dashed lines so the AI knows when it is legally allowed to merge or turn. Hazard Awareness: Labeling temporary markings like orange construction cones or painted arrows to help the car adapt to changing road conditions. Without these precise digital guidelines, a vehicle wouldn’t understand the difference between a double yellow line that prohibits passing and a dashed white line that allows a lane change. Tumor Detection in Medical Imaging In the medical sector, AI can act as a second set of eyes for radiologists, helping them spot tiny anomalies that might be missed by the human eye. To train these systems, medical experts use polygon annotation to trace the exact, often irregular shapes of tumors or lesions in X-rays and MRIs. This high-precision labeling allows medical AI to perform several sophisticated computer vision tasks, including: Growth Tracking: By comparing the area of a polygon over several months, doctors can see if a tumor is shrinking or growing. Tissue Differentiation: Labeling different types of tissue allows the AI to distinguish between a healthy organ and a potentially dangerous mass. Surgical Planning: Providing a precise map of a tumor's boundaries helps surgeons understand exactly where to operate while avoiding healthy tissue. When an AI is trained on thousands of these detailed outlines, it can eventually scan a new patient's scan and immediately flag suspicious areas for a doctor to review. This speeds up the diagnostic process and ensures that treatment can begin as early as possible. Facial Recognition Tracking for Security All facial recognition programs and devices depend on image annotation. To teach the algorithms to recognize an authorized user, annotators use key-point annotation to place digital dots on specific anchors, such as the corners of the eyes, the bridge of the nose, and the edges of the lips. These points create a mathematical map of the face that remains consistent even if a person changes their expression, grows hair, or ages. This technology powers the security systems on our smartphones and in high-security facilities, allowing the computer to verify an identity in milliseconds. To create a robust security profile, the annotation process focuses on these structural details: Anatomical Mapping: Placing dozens of dots on the face to capture the distance between features, which is unique to every individual. Expression Invariance: Training the model to recognize a face even when the person is smiling, frowning, or talking. Obstruction Management: Labeling faces with glasses, masks, or hats so the AI learns to identify the person despite partial visual blocks. By training on these landmark points, the AI learns to ignore temporary changes like lighting or shadows and focus on the underlying bone structure. Environmental Monitoring via Satellite Imagery Satellites and drones capture massive amounts of data every day, but this information is only useful if we can categorize what we are looking at. Image annotation allows researchers to use semantic segmentation to label every pixel in a satellite image, such as forest, water, or urban area. This creates a color-coded map that shows how the environment is changing over time. For instance, if a specific region is labeled as forest in 2020 and urban in 2024, the AI can automatically calculate the rate of deforestation. By labeling these vast landscapes, environmental scientists can achieve the following: Automated Land Use Mapping: Categorizing thousands of square miles of land into agricultural or residential zones without manual inspection. Disaster Impact Assessment: Using bounding boxes to count damaged structures after a storm to estimate the total cost of the destruction. Wildlife Protection: Identifying and tracking changes in animal habitats by monitoring the movement of ice caps or the density of forest canopies. Modern AI is moving the agricultural industry far beyond simple mechanization to autonomous equipment that significantly boosts production, and it’s largely thanks to image annotation. Where Do Companies Get Images for Data Annotation? As we explained in the intro, a model is only as smart as the variety of examples it has seen. If a dataset for modern agriculture only contains images of cornfields in bright sunlight, the AI will likely fail when it encounters a cloudy day or a different crop. That means you need a diverse dataset to ensure the model works in real world situations and not just in a controlled lab environment. High-quality datasets must account for different lighting, angles, weather conditions, and backgrounds to prevent the AI from developing a narrow, biased perspective. As you can imagine, these datasets tend to be quite huge, so consideration must be made as to how the datasets are obtained in the first place. This begs the question, should an entity opt for proprietary or open datasets? Let’s examine both cases in more detail. Proprietary Datasets Certain AI applications require a specialized foundation that open-source collections cannot provide. Imagine that you wanted to train an AI to detect a particular type of defect on a manufacturing process developed in-house. By definition of the process’ proprietary nature, it would be close to impossible to find an open dataset with the images needed for training. The datasets, in this case, would necessarily need to be produced in house. Another factor to consider is that open datasets are also limited in terms of data diversity. This often means they lack the selectivity required for a particular subject matter, which can lead to gaps in a model's understanding or a limit on its performance. The benefits of creating a proprietary dataset include: Total Subject Control: You determine exactly what objects, environments, and conditions are captured to match your specific use case. Image Quality Oversight: You can ensure that the resolution, lighting, and angles of your data meet the high standards required for precise AI training. Enhanced Diversity: By curating your own data, you can intentionally include rare edge cases and hard negatives that general public datasets often overlook. Alt text: "File:Voiture Google Maps Street Suisse 2019.jpg"editkeyboard_arrow_down The downside of creating such a dataset, is that the task requires vast resources in terms of image data collection (taking photos), data cleaning and preprocessing, annotation and labelling, quality control, storage and management. It is a time-consuming, and costly exercise. Some examples of companies making use of their own proprietary datasets include Tesla and Google. Tesla collects footage from their own vehicle sensors and makes use of this image data to train its self-driving AI feature (also known as FSD). Similarly, Google uses images gleaned from their own image assets for training Google Lens and Street View AI. Open Datasets One alternative (often used by smaller companies) is to use open image datasets, which reduce costs and speed up development of models. A perfect example of this in practice is a startup building an AI-powered security system for office buildings. Rather than spending months photographing every possible office chair, laptop, or coffee mug to teach the AI what these objects look like, they can use the COCO dataset. Since COCO already contains over 330,000 images with labels for 80 common objects, including furniture and electronics, the company can save thousands of dollars and hundreds of hours by using this pre-labeled data as their starting point before adding more custom data. Another benefit of open datasets is they tend to be created by universities and government institutes, and are often freely available for research use and non-commercial use. The downside of using open datasets is that they may lack specialization for specific tasks, as per the manufacturing example in the section on proprietary datasets. Panoptic segmentation datasets from COCO. Source: https://cocodataset.org. To summarize the comparison between proprietary and open datasets, think of proprietary and open datasets as bespoke tailored clothing versus clothing bought “ready to wear” from a shopping mall. With the tailored garment (a proprietary dataset), you get to choose the material, the fit, the exact color, and any other features that you desire, but the customization comes at a premium price. With ready to wear clothing (an open dataset), you are restricted to whatever is on the shelf in terms of size, style and color, but you save a lot of money compared to the bespoke option. Where Can I Find Open Datasets to Use? To find open datasets for your computer vision projects, you can explore several well-established repositories maintained by major tech companies and academic institutions. Platforms like COCO (Common Objects in Context) and Google Open Images offer millions of diverse images with high-density annotations for object recognition and segmentation. Additionally, hubs like Hugging Face or Roboflow allow you to search through thousands of community-contributed datasets that can be integrated directly into your workflow. If you are looking for an open dataset to test out, the following popular open datasets can all be imported into CVAT image annotation tool for data labeling. Dataset Description Common Uses COCO 330K images with object detection, segmentation, and captions Object recognition PASCAL VOC Object detection dataset with labeled images Detection and segmentation Open Images 9M+ images with bounding boxes and segmentation masks Detection LIDI-IDRI Lung cancer CT scans for medical AI training Medical diagnosis Google Open Buildings Global dataset of building footprints City planning / GIS Can I Upload my own Image Dataset to CVAT? While open datasets are excellent for general research, most production-level AI requires data that is unique to your specific business environment. CVAT is designed to be highly flexible, allowing you to upload your own proprietary images or video files directly into the platform. If you have your own dataset that you want to use, you can upload it by: Open the project on the Projects page. Open the Actions menu in the upper right corner. Click Import dataset. Select the dataset format. Drag the file to the file upload area or click on the upload area to select the file through the explorer. Once your files are successfully uploaded, the raw data is transformed into an interactive workspace where your team can begin the annotation process. CVAT provides a suite of professional-grade tools such tools include cuboid annotation (for objects with depth or volume), attribute annotation, tag annotation, and a plethora of different shape annotation tools for 2D objects so you can get started. How Does Image Annotation Work & What Tasks Are There? So, you’ve decided exactly where your dataset is coming from, and are ready to begin the process of adding context to the data for training your model. This is where the image annotation phase (and image annotation software like CVAT) comes into play. At its core, the process of image annotation involves highlighting the item of interest in an image or video data, and adding context via text-based notes to the item in question. The type of annotation would depend on the intended use of the data. For example, if you wanted to train a model to recognize the presence of a cat in an image (image classification), you would upload image data consisting of cats in various scenes. You could then instruct your in-house or third-party image annotation services team to sort through the images, and add a text description indicating if a cat is present in the image, or not. More advanced tasks (such as “detection”) would require a bounding box to be drawn around the cat in the image, with various other descriptions (such as color or breed) added as tags. Image annotation tasks can generally be divided into three different categories, which are classification, detection, and segmentation. Let's take a look at the three categories in more detail. Image Classification Image classification is the most basic of image annotation categories. It involves applying a label (or labels) to a singular image and simply helps the AI model to identify if such an object is present. With the image classification method, the object location is not specified, only its presence in the image. The label will then aid the computer vision model in identifying similar objects throughout the whole dataset. As an example, your team might be training an AI to recognize images of cats. With the image classification method, each image could be labelled as “cat” (if present) or “no cat” (if not present). Additional tags could be added to classify each image by breed, or by color. But the classification model would not be able to identify where exactly the cat is located within the image. Here’s a helpful image classification walkthrough video: With image classification, it is not necessary to use the shape drawing notation tools, as the labels/tags are applied to the entire image. To indicate where the object is located in the image, you need to use a detection model. #2 Object Detection Detection expands upon classification by adding a localization element. Detection not only identifies the presence of an object in an image, but adds spatial information, which helps to identify the object’s location in the image. Such tasks require the use of drawing tools (such as a rectangle/bounding box, polygon, or ellipse) to be added during notation to highlight where the object of interest is positioned. These drawing tools help the AI model understand both the object’s presence and its position in the image. Additionally, if there are multiple objects in the image, the detection model can specify how many there are, and more advanced models can even assign a confidence score, which indicates the likelihood that the identification is correct. Finally, more advanced models can also detect interactions and relationships between multiple models. Object detection use cases include self-driving, which rely on object detection to recognize objects such as cars and pedestrians. So going back to our cat example, a detection model could identify that there are two cats, it could classify them according to breed (with a confidence score), and then infer one cat’s position in relation to another cat. If you are looking for a more detailed walkthrough, this video by Roboflow is a great resource. Image Segmentation Segmentation annotation is the most advanced of the three categories, and divides an image into discrete areas, providing pixel-level accuracy. There are three main subcategories of segmentation in computer vision, which are Semantic, Instance and Panoptic Segmentation types. 1. Semantic Segmentation With semantic segmentation, each pixel of the object of interest is assigned a class label. Whereas the detection model will use a bounding box to assign a general class and location within the image, defining the object at a pixel level allows the model to detect the shape with more precision. For example, an image might have a cat drinking out of a bowl while another cat sleeps nearby. During the annotation process, the annotator could use a brush tool to paint the pixels of both of the cats, or use a polygon tool. All the pixels within the masks would be classed as “cat”. Similarly, the bowl could also be annotated, with all the bowl pixels labeled as “bowl”. With semantic segmentation, the model does not distinguish between multiple objects of the same class. Both cats, despite being in their own discrete regions, would simply be classified as “cat”. To distinguish multiple instances of the same class, you need to use instance segmentation. 2. Instance Segmentation An instance segmentation model also uses masks to assign pixel-level classification to objects, but unlike semantic segmentation, it can identify different instances of the same class. For example, it could distinguish between two cats in an image, each with a different label. During the annotation process, the annotator would create a mask around each cat, showing the exact shape and boundaries of each cat. Unlike detection, which only provides a bounding box, instance segmentation gives a detailed pixel-by-pixel representation of each cat. 3. Panoptic Segmentation The final category is panoptic segmentation, which combines the benefits of both instance segmentation and semantic segmentation to create a more complete understanding of an image. In this approach, annotators categorize both background elements (such as a wall, or carpet) as well as countable objects such as people, cars, or cats. If there was an image of three cats lounging on a patterned rug, using the panoptic segmentation method, we would treat the rug as a single background element, applying one uniform label to it. Each cat would be identified individually, with separate segmentation masks, distinguishing them even if they are curled up together or partially overlapping (occluded). This method gives AI a more complete understanding of a scene, allowing it to recognize both the setting and the objects within it. Annotation Category Summary Before we take a more in-depth look at the various drawing tools, let’s just summarize the annotation categories above in terms of their function, along with some non-feline related applications. Category Description Application Examples Classification Labels applied to whole image 1. Medical Diagnosis – AI classifies chest X-rays as "pneumonia" or "healthy." 2. Wildlife Monitoring – Identifies if an image contains a "lion," "elephant," or is "empty." Detection Labels applied to bounding boxes 1. Security Surveillance – Identifies and tracks intruders in CCTV footage. 2. Retail Analytics – Detects customers in stores to analyze foot traffic. Semantic Segmentation Labels applied to pixels by class 1. Medical Imaging – Segments tumors in MRI scans for precise diagnosis. 2. Satellite Imagery – Classifies land use (forests, roads, water bodies) for urban planning. Instance Segmentation Labels applied to pixels by instance 1. Autonomous Robots – Identifies and separates objects for robotic grasping. 2. Sports Analytics – Tracks individual players in a soccer match for performance analysis. Panoptic Segmentation Labels applied to all pixels 1. Self-Driving Vehicles – Separates roads, sidewalks, and vehicles for navigation. 2. Smart City Planning – Maps buildings, roads, and natural areas from satellite images. What Are The Most Common Types of Image Annotation Techniques, Shapes, & Tools? An effective image annotation software should be capable of annotating objects that are both static (shape mode) and objects in motion, across multiple frames (frame mode). And it should be able to use any kind of common image file, such as JPEG, PNG, BMP, GIF, PPM and TIFF. To make shape annotation tasks a cinch, CVAT allows users to annotate with rectangles, polygons, polylines, ellipses, cuboids, skeletons, and with a brush tool. While the various shape annotation tools can be used interchangeably in many situations, each tool works optimally for specific types of task. Bounding Boxes / Rectangles Annotating with rectangles is one of the easiest methods of image annotation. Also known as a “bounding box” or “bbox” for short, this shape is best suited for the detection of uncomplicated objects such as doors on a building, street furniture, packing boxes, animals, and faces. They can even be used for notation of people both static and in motion. This is particularly useful for surveillance or tracking projects, although if pose estimation is required, more detailed annotations such as skeleton or polygons could be a better option. Overall, annotation with bounding boxes is an easy and computationally efficient method well-suited for quick object detection of a broad range of subjects. If you want a quick way to identify the general presence and location of the object, then this shape is a great place to start. Polygons Offering a higher level of precision than rectangles, annotating with polygons is better suited for objects with irregular shapes requiring a more accurate boundary delineation. Drawing a polygon allows a much higher level of detail, as it can closely follow the curves and shape of an object, making it well suited for tasks that require pixel-level analysis. Polygons can also be used for creating masks for semantic segmentation, instance segmentation and panoptic segmentation. Polygon annotation can be used for the detection of objects such as geographical features on satellite images, tumors in medical imagery, types of plants in plant identification, and pretty much anything where an object’s shape is too complex to be captured by a rectangle. If a rectangular notation is best suited for broad object detection tasks, polygons are more optimally used for tasks such as image localization, segmentation, or detailed recognition. To put it another way, while a rectangle annotation is fine for detecting faces, polygons are better for detecting facial features such as mouths, eyes, and noses. Ellipses Annotating with ellipses is the method most useful for the detection of round objects, either elliptical, circular or spherical. If you want to quickly annotate objects such as wheels, various fruits, or even the eyes on a face, then ellipses are the perfect shape for the task. Applications where you might wish to use elliptical annotations include cell detection in medical imaging, pupils in eye tracking, astronomical objects, circular craters in geospatial mapping, or egg monitoring in a hatchery. Polylines The previously mentioned notation types have focused on objects with enclosed regions. Polylines also allow for the notation of elongated, thin enclosed shapes, but also permit the notation of non-enclosed linear, continuous objects. To that end, polyline notation is the most optimal choice for objects with long boundaries and contours that do not need to be fully enclosed, such as railways lines or roads. It is also extremely handy when it comes to tasks requiring path-based analysis, such as object tracking, and for connecting key points in pose estimation tasks. Specific examples of applications using polylines include footpaths and rail lines in aerial mapping, general linear infrastructure inspection, text lines and paragraphs in OCR, animal and human skeletons in pose estimation, and moving objects in video sequences. To sum it up, polylines are at their most useful when the goal is to track, detect, or measure linear features. Brush Tool The brush tool is a free-form tool that allows the manual painting of objects, and the creation of masks. Masking is particularly useful for annotating singular objects that may appear split in two, such as a vehicle with a human standing in front of it. Annotating with the brush tool is ideal for applications that require a high level of precision, such as medical imaging, object detection, or autonomous driving. Skeletons Annotating with skeletons is the best option when dealing with tasks requiring the analysis of complex and consistent structures, such as human figures. It’s also a little more involved than the other annotation processes we have looked at in this article, which is why we have saved it until the end! A Skeleton consists of multiple points (also referred to as elements), which may be connected by edges. Each point functions as an individual object, with its own unique attributes and properties such as color, occlusion, and visibility. Skeleton annotations can be used for both static and moving images, although they are used in different ways for each type. When using skeleton notation with static images, they are best used when analyzing a single pose, whereas in video, they can be used for more dynamic applications (such as tracking movement over time). Other specific applications of skeleton-based annotations include gait analysis, workplace ergonomics assessments, gesture recognition for sign language, crime scene analysis, and avatar posture recognition in AR/VR environments. Out of the various other methods we have looked at for notating static images in this article, notating with skeletons is generally the most complex. However, the whole process of annotating with skeletons is made much more user-friendly with CVAT. How Can AI Assist with Image Data Annotation? As seen in the previous section, annotating with various shapes is a straightforward experience. But these tasks can be made easier still, thanks to various AI automation features. AI-assisted image annotation makes use of pre-trained ML models for the detection, classification, and segmentation of objects within image datasets. CVAT can use pre-installed models, and can also integrate with Hugging Face and Roboflow for cloud-hosted instances. For organizations using a self-hosted setup, custom models can be connected with Nuclio or AI agents. AI models in CVAT, such as YOLOv3, YOLOv7, RetinaNet, and OpenVINO-based models, provide accurate object detection, facial recognition, and text detection, while the recently integrated SAM 2 and SAM 3 has set a new standard for interactive segmentation. CVAT’s automated shape annotations and labeling features can significantly accelerate the complex image annotation process, potentially improving speed by up to 10 times. These features leverage various machine learning algorithms for tasks like object detection, semantic segmentation, and object tracking. Automatic Labeling using pre-trained deep learning models (e.g., OpenVINO, TensorFlow, PyTorch). Semi-Automatic Annotations (e.g., interactive segmentation). Automatic Mask Generation: AI models can generate segmentation masks for complex objects. Smart Polygon Tool: Automatically refines polygon shapes around detected objects. Pre-Trained Object Detectors: Detects and labels objects using AI models like YOLO, Mask R-CNN, or Faster R-CNN. We will do a deep dive into the automation side of image annotation in another post - we just thought we would draw your attention to its existence, just in case you wanted to know how AI itself can be used to make the model training process even more efficient. Make Image Annotation & Labeling Easier with CVAT Annotation Software As you have seen in this article, there are numerous techniques in image annotation specific for a range of different computer vision projects and use cases. The good news is that CVAT offers all the aforementioned tools in a handy and easily accessible solution. So whether your team is training a computer vision model, engaging in supervised learning, or conducting a performance evaluation, then the CVAT platform can help with all of your data annotation needs. CVAT takes away the headaches of creating annotated datasets with its innovative and user-friendly approach to annotation and task allocation. With its image annotation tool, your organization can: Upload datasets of visual assets Break the sets down into smaller chunks Distribute them to team members anywhere on earth. Once the team members receive their tasks, they are able to use the intuitive image annotation engine to quickly add context to both image and video datasets. And, if you don't have enough resources to do annotation in-house, CVAT's professional annotation services team is available to provide high-quality, expertly labeled datasets, ensuring your machine learning models receive the precise training data they need. So, to summarize - CVAT's image annotation platform can be used for any visual object, whether it's flat or three-dimensional, static or dynamic. And the drawing tools are fundamentally the same for whichever scenario. Ready to start labeling? Experience the full power of our intuitive annotation engine directly in your browser. Whether you are a solo researcher or a growing startup, CVAT Online provides the tools you need to build high-quality datasets without the overhead of local installation. Need robust security and team-wide orchestration? For organizations requiring advanced data privacy and dedicated support, CVAT Enterprise is built to scale with your production pipeline. Take total control of your data lifecycle with self-hosted deployments and enterprise-grade project management. Image Annotation FAQs How Long Does Image Annotation Take? The time required for image annotation projects depends heavily on the complexity of the task and the precision needed. Classification: Tagging an entire image (e.g., a cat) takes only 1–2 seconds. Bounding Boxes: Drawing rectangles for object detection takes 5–15 seconds per object. Polygons: Tracing irregular shapes for instance segmentation can take 30–90 seconds per object. Semantic Segmentation: Pixel-perfect labeling of an entire scene is the most labor-intensive, often requiring 15–60 minutes per image. Factors like image resolution, object density, and whether you use AI-assisted tools (which can reduce time by up to 80%) also play a massive role. Also, remember that some of these datasets have hundreds of thousands (and sometimes millions of annotated images). So even though annotating a single image may seem quick, it is a never ending task. What Are The Differences Between Semantic Segmentation, Instance Segmentation, and Panoptic Segmentation? These three methods offer varying levels of detail for scene understanding: Semantic Segmentation: Groups all pixels of the same category into one mask. If there are five cars, they are all colored the same, you can't tell where one ends and the next begins. Instance Segmentation: Identifies and outlines every individual object. It treats each car as a unique entity but often ignores background stuff like the sky or road. Panoptic Segmentation: The ultimate view that combines both by labeling every pixel in the image with a class (Semantic) and a unique ID (Instance). Do You Need Your Own Dataset To Perform Image Annotation for Machine Learning? Not necessarily. While custom projects often require specific data, you can start with public datasets or synthetic data. Open-Source Repositories: Large-scale datasets like COCO, ImageNet, and Google Open Images provide millions of pre-annotated images for common objects. Scraping: You can use APIs or web scrapers to gather raw images from the web, though you must respect copyright and privacy laws. Synthetic Data: Tools like Unity or NVIDIA Omniverse can generate perfect pixel-labeled data from 3D simulations. However, for specialized industrial or medical AI, collecting a proprietary dataset is usually unavoidable. What Do You Need To Start Annotating Images? Before you click the first pixel, you need three core components: The Data: A structured set of raw images or video frames. The Tool: An annotation platform (like CVAT) that supports your required output format (JSON, XML, or Mask). The Guidelines: A detailed manual for annotators. This prevents labeler drift, where different people interpret the edge of a tree differently. If you are working at scale, you’ll also need a Quality Assurance (QA) workflow to review work and a Project Manager to track progress and class balance.
Annotation 101
March 12, 2026
Image Annotation Explained: What It Is & How to Do It Right

.svg)


.webp)
.webp)

.webp)


.jpg)
.png)

.png)


