Manual data labeling can be a real slog, especially when you’re working with massive datasets. That’s why automated annotation is such a lifesaver—it speeds up the process, ensures consistency, and frees you up to focus on building smarter machine learning models. CVAT OGs know that all our platforms support a number of options for automated annotation using ML/AI models, including:
These methods are used and loved by thousands of users, but because data annotation projects come in all shapes and sizes, they may not work for everyone. Nuclio functions, for example, are currently managed by the CVAT administrator and are limited to CVAT Community and Enterprise editions. Roboflow and Hugging Face support a limited range of model architectures. CLI-based annotation requires users to set up and run models only on their own machines, which can be hardware-intensive and time-consuming for some teams.
Today, we’re excited to share that CVAT is addressing all these limitations with the launch of AI agents.
What is a CVAT AI agent?
An AI agent in CVAT is a process (or service) that runs on your hardware or infrastructure and acts as a bridge between the CVAT platform and your AI model. Its main role is to receive auto-annotation requests from CVAT, transfer data (e.g., images) to your model for processing, retrieve the resulting annotations (e.g., object coordinates, masks, polygons), and send these results back to CVAT for automatic inclusion in your task.
In other words, CVAT AI agents work as a bridge between your custom model and the CVAT platform, enabling seamless integration of your model into the auto-annotation process.
How are CVAT AI agents different from other automation methods?
- Customization and accuracy: Unlike with Roboflow, or Hugging Face integrations, you can now use your own AI models, tailored specifically to your datasets and tasks, to produce precise annotations that meet your exact training requirements.
- Collaboration and accessibility: Unlike CLI-based annotations, AI agents allow you to centralize your model setup and share it across your organization. Team members can access and use the models without any additional setup.
- Flexibility across platforms: AI agents don’t require CVAT administrator control and are available on CVAT Online and Enterprise, version 2.25 or later, giving you the freedom to deploy and manage your models in any environment.
These features make CVAT AI agents a powerful tool for scaling your annotation processes while maintaining accuracy, collaboration, and control.
How to annotate data with CVAT AI agent
Now, let’s see how to set up automated data annotation with a custom model using a CVAT AI agent. For that, you will need:
- An account on a CVAT instance. In the tutorial we’ll use CVAT Online, but you can use your own CVAT On-prem instance if you wish - just substitute your instance’s URL in the commands.
- A CVAT task with labels from the COCO dataset (or a subset of them) and some images.
You will also need to install Python and CVAT CLI to your machine.
Refresher: CLI-based annotation
Let’s first briefly review how CLI-based annotation works, since the agent-based method has a lot in common with it.
First, you need a Python module that implements the auto-annotation function interface from the CVAT SDK. These modules will serve as bridges between CVAT and whatever deep learning framework you might use. For brevity, we will refer to such modules as native functions.
The CVAT SDK includes some predefined native functions (using models from torchvision), but for this article, we’ll use a custom function that uses YOLO11 from Ultralytics.
Here it is:
import PIL.Image
from ultralytics import YOLO

import cvat_sdk.auto_annotation as cvataa

_model = YOLO("yolo11n.pt")

spec = cvataa.DetectionFunctionSpec(
    labels=[cvataa.label_spec(name, id) for id, name in _model.names.items()],
)

def _yolo_to_cvat(results):
    for result in results:
        for box, label in zip(result.boxes.xyxy, result.boxes.cls):
            yield cvataa.rectangle(int(label.item()), [p.item() for p in box])

def detect(context, image):
    conf_threshold = 0.5 if context.conf_threshold is None else context.conf_threshold
    return list(_yolo_to_cvat(_model.predict(
        source=image, verbose=False, conf=conf_threshold)))
Save it to yolo11_func.py., and then run:
cvat-cli --server-host https://app.cvat.ai --auth "<user>:<password>" task auto-annotate <task id> --function-file yolo11_func.py --allow-unmatched-labels
This will make the CLI download the images from your task, run the model on them and upload the resulting annotations back to the task.
Note: long-time readers might notice a few changes since the last time we talked about CLI-based annotation on this blog. In particular, we changed the command structure of CVAT so that you have to use task auto-annotaterather than justauto-annotate. In addition, native functions can now support custom confidence thresholds, so our YOLO11 example reflects that.
Registering the function with CVAT
Now, let’s see how we can integrate the same model as an agent-based function.
An important thing to know is that the agent-based functions feature also uses native functions. In other words, if you already have a native function you’ve used with the cvat-cli task auto-annotate command, you can use the same function as an agent-based function, and vice versa. So let’s reuse the yolo11_func.py file we just created.
First, we must let CVAT know about our function. Use the following command:
cvat-cli --server-host https://app.cvat.ai --auth “<user>:<password>” function create-native "YOLO11" --function-file yolo11_func.py
The string “YOLO11” here is just a name that CVAT will use for display purposes; you can use any name of your choosing.
Now, if you open CVAT and go to the Models tab, you will see our model there, looking something like this:
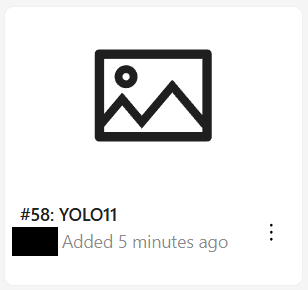
You can click on it and check that it has all the expected properties, such as label names. However, if you actually try to use this model for automatic annotation, it will not work. The request will stay “queued”, and after a while, it will automatically be aborted. That’s because we need to do one final step.
Note: At no point in the process does the function itself (like the Python code or weights) get uploaded to CVAT. The only information the registration process transfers to CVAT is metadata about the function, such as the name and list of labels.
Powering the function with an agent
We must now run an agent that will process requests for the function. Use the following command:
cvat-cli --server-host https://app.cvat.ai --auth “<user>:<password>” function run-agent 58 --function-file yolo11_func.py
Instead of 58, substitute the model ID you see in the CVAT UI. You can also find the same ID in the output of the function create-native command. This command starts an agent for our function, which runs indefinitely. The job of the agent is to process all incoming auto-annotation requests involving the function.
While the agent is running, open your task in CVAT and click Actions -> Automatic annotation. You’ll be able to select the YOLO11 model and set the auto-annotation parameters, like for any other type of model CVAT supports.
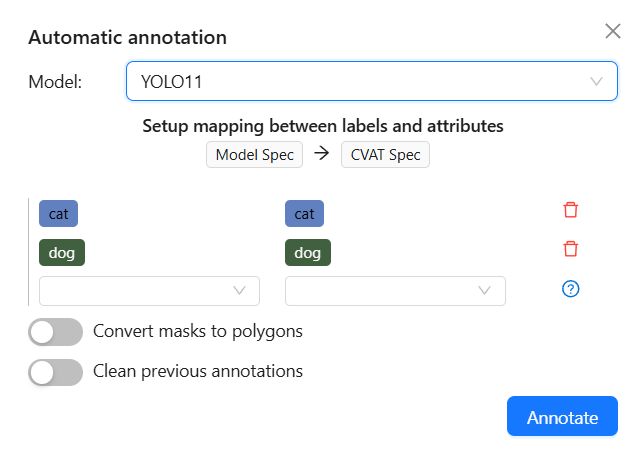
Click "Annotate." After a short delay, you should see the agent start printing messages about processing the new request. Once it’s done, CVAT should notify you that the annotation is complete. You can then examine the jobs of your task to see the new bounding boxes. The agent will keep running, ready to process more requests.
Cleanup
Now that we’re done testing the function, we can remove it from CVAT. First, interrupt the agent by pressing Ctrl+C in the terminal. Second, delete the function by running the following command:
cvat-cli --server-host https://app.cvat.ai --auth “<user>:<password>” function delete 58
Alternatively, you can do this through the UI: find the model in the Models tab, click the ellipsis and select Delete.
Working in an organization
In the preceding tutorial, you added the function to your personal workspace. In this case, only you can annotate with it. Now let’s discuss what’s needed to share a function with an organization.
First, you’ll need to add an --org parameter to all of your CLI commands:
cvat-cli --org <your organization slug> ...
Second, you should be aware of the permission policy when you work in an organization. A function can be…
- … added by any organization supervisor.
- … removed by its owner or any organization maintainer.
- … used to auto-annotate a task by any user that has write access to that task.
These rules are the same as for Roboflow and Hugging Face functions.
In addition, to power a function, an agent must run as that function’s owner or any organization maintainer. However, an agent must be able to access data for tasks it’s requested to process. So if you want to make it possible to use the function on any task in the organization, you should run the agent as a user with the maintainer role.
Technical details
The following diagram shows the major components involved in agent-based functions.
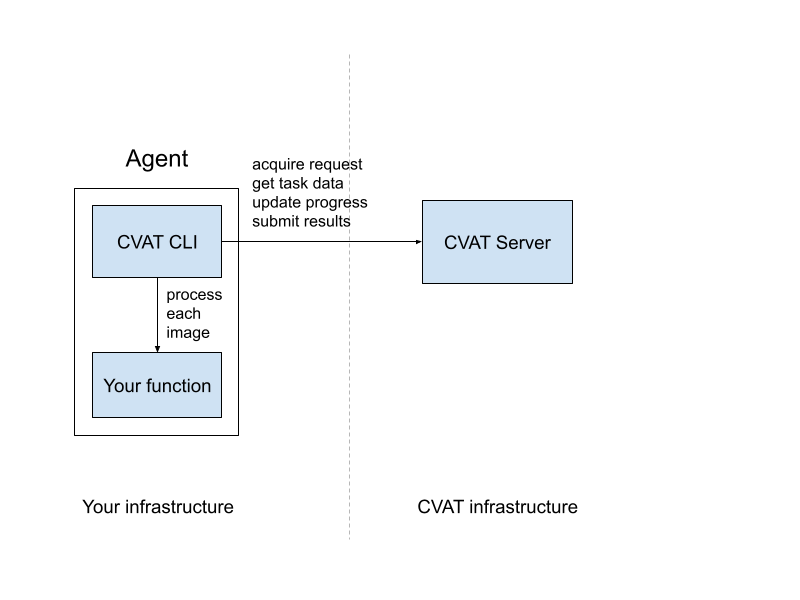
In the general case, the agent can run in a completely separate infrastructure from the CVAT server. The only requirement is that it’s able to connect to the CVAT server via the usual HTTPS port. The agent does not need to accept any incoming connections. Of course, if you run your own CVAT instance, you can run the agent in the same infrastructure, even on the same machine if you’d like.
While so far we’ve been talking about the agent, you’re not actually limited to running one agent per function. If you’d like to be able to annotate more than one task at a time, you can run multiple agents:
.png)
All annotation requests coming from the users are placed in a queue and distributed to agents on a first-come-first-serve basis. If one agent crashes or hangs while processing a request, that request will eventually be reassigned to another agent.
Get started with CVAT AI agents
CVAT AI agents are here to level up how teams automate data annotation. Now, you can use models trained just for your unique datasets or tasks, no matter if you’re on CVAT Online or On-Prem. This means:
✅ more precise annotations that are better aligned with your requirements,
✅ less manual fixing, and
✅ datasets that are ready to go for AI training or deployment.
And, with a centralized setup, your whole team can easily access the model, speeding up workflows and improving collaboration.
Ready to take your automated annotation to the next level? Sign up or log in to your CVAT Online account or contact us to get CVAT with AI agents support on your server.


.png)



.svg)
.png)

.png)


.png)